/** * Causes this thread to begin execution; the Java Virtual Machine * calls the <code>run</code> method of this thread. * <p> * The result is that two threads are running concurrently: the * current thread (which returns from the call to the * <code>start</code> method) and the other thread (which executes its * <code>run</code> method). * <p> * It is never legal to start a thread more than once. * In particular, a thread may not be restarted once it has completed * execution. * * @exception IllegalThreadStateException if the thread was already * started. * @see #run() * @see #stop() */ publicsynchronizedvoidstart(){ /** * This method is not invoked for the main method thread or "system" * group threads created/set up by the VM. Any new functionality added * to this method in the future may have to also be added to the VM. * * A zero status value corresponds to state "NEW". */ if (threadStatus != 0) thrownew IllegalThreadStateException();
/* Notify the group that this thread is about to be started * so that it can be added to the group's list of threads * and the group's unstarted count can be decremented. */ group.add(this);
boolean started = false; try { start0(); started = true; } finally { try { if (!started) { group.threadStartFailed(this); } } catch (Throwable ignore) { /* do nothing. If start0 threw a Throwable then it will be passed up the call stack */ } } }
privatenativevoidstart0();
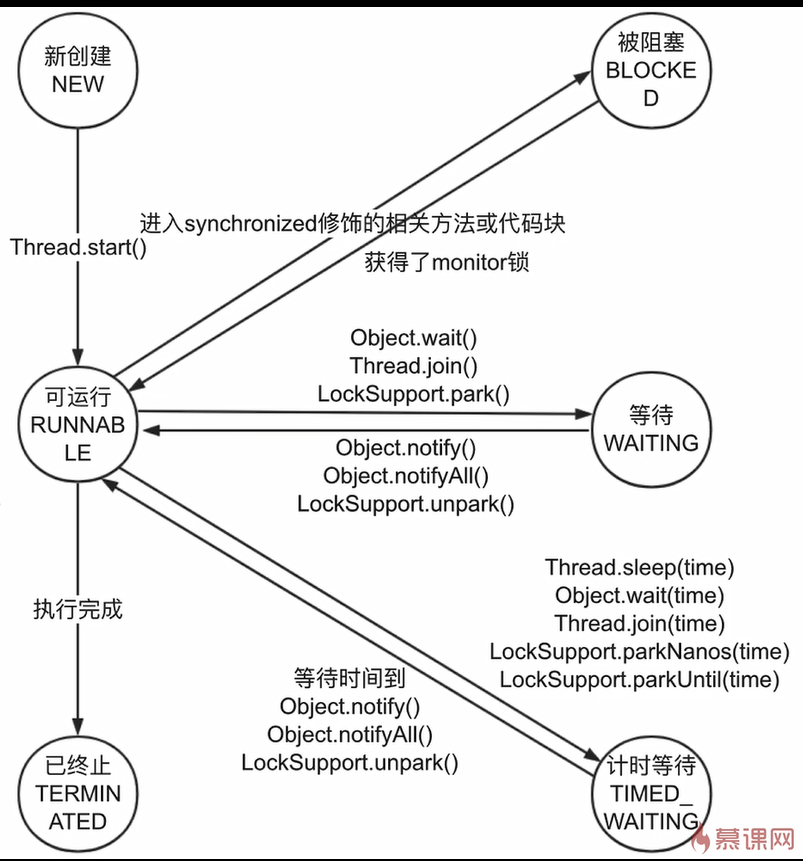
2. run 方法
作用
执行该线程任务
源码解读
1 2 3 4 5 6 7 8 9 10 11 12 13 14 15 16 17 18
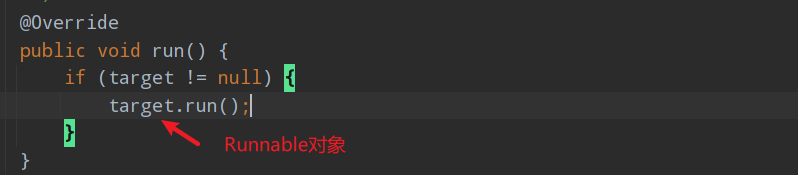
/** * If this thread was constructed using a separate * <code>Runnable</code> run object, then that * <code>Runnable</code> object's <code>run</code> method is called; * otherwise, this method does nothing and returns. * <p> * Subclasses of <code>Thread</code> should override this method. * * @see #start() * @see #stop() * @see #Thread(ThreadGroup, Runnable, String) */ @Override publicvoidrun(){ if (target != null) { target.run(); } }
3. 面试题
两次调用 start 方法会出现什么情况?
参考 start 方法源码解读
为什么不能直接调用 run 方法
start 方法用于创建新的线程,如果直接调用 run 方法则是有 main 线程调用 run 方法
static Random rdm = new Random(); privatestatic TransferMoney.Account[] accounts = new TransferMoney.Account[NUMS_ACCOUNT];
publicstaticvoidmain(String[] args){ for (int i = 0; i < NUMS_ACCOUNT; i++) { accounts[i] = new TransferMoney.Account(NUMS_MONEY); } ExecutorService threadPool = Executors.newFixedThreadPool(20); for (int i = 0; i < NUM_THREDS; i++) { threadPool.execute(new TransferMoneyThread()); } }
staticclassTransferMoneyThreadimplementsRunnable{
@Override publicvoidrun(){ for (int i = 0; i < NUMS_TRANSFERS; i++) { int accountFromIndex; int accountToIndex; do { accountFromIndex = rdm.nextInt(NUMS_ACCOUNT); accountToIndex = rdm.nextInt(NUMS_ACCOUNT); } while (accountFromIndex == accountToIndex); int money = rdm.nextInt(NUMS_MONEY); TransferMoney.transferMoney(accounts[accountFromIndex], accounts[accountToIndex], money); } System.out.println("转账结束"); } } }
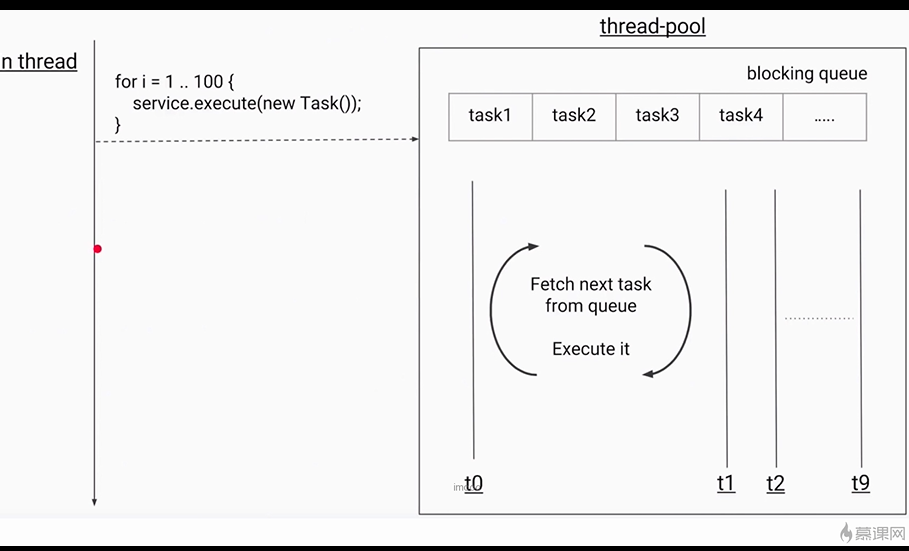
publicvoidexecute(Runnable command){ if (command == null) thrownew NullPointerException(); //获取线程池状态 int c = ctl.get(); if (workerCountOf(c) < corePoolSize) { if (addWorker(command, true)) return; c = ctl.get(); } //判断线程池状态以及任务队列是否满了 if (isRunning(c) && workQueue.offer(command)) { int recheck = ctl.get(); if (! isRunning(recheck) && remove(command)) reject(command); elseif (workerCountOf(recheck) == 0) addWorker(null, false); } // elseif (!addWorker(command, false)) reject(command); }
//调用addWorker创建新的工作线程 boolean workerStarted = false; boolean workerAdded = false; Worker w = null; try { w = new Worker(firstTask); final Thread t = w.thread; if (t != null) { final ReentrantLock mainLock = this.mainLock; mainLock.lock(); try { // Recheck while holding lock. // Back out on ThreadFactory failure or if // shut down before lock acquired. int rs = runStateOf(ctl.get());
if (rs < SHUTDOWN || (rs == SHUTDOWN && firstTask == null)) { if (t.isAlive()) // precheck that t is startable thrownew IllegalThreadStateException(); workers.add(w); int s = workers.size(); if (s > largestPoolSize) largestPoolSize = s; workerAdded = true; } } finally { mainLock.unlock(); } if (workerAdded) { t.start(); workerStarted = true; } } } finally { if (! workerStarted) addWorkerFailed(w); } return workerStarted;
//然后调用runWorker执行当前线程的任务
finalvoidrunWorker(Worker w){ Thread wt = Thread.currentThread(); Runnable task = w.firstTask; w.firstTask = null; w.unlock(); // allow interrupts boolean completedAbruptly = true; try { while (task != null || (task = getTask()) != null) { w.lock(); // If pool is stopping, ensure thread is interrupted; // if not, ensure thread is not interrupted. This // requires a recheck in second case to deal with // shutdownNow race while clearing interrupt if ((runStateAtLeast(ctl.get(), STOP) || (Thread.interrupted() && runStateAtLeast(ctl.get(), STOP))) && !wt.isInterrupted()) wt.interrupt(); try { beforeExecute(wt, task); Throwable thrown = null; try { task.run(); } catch (RuntimeException x) { thrown = x; throw x; } catch (Error x) { thrown = x; throw x; } catch (Throwable x) { thrown = x; thrownew Error(x); } finally { afterExecute(task, thrown); } } finally { task = null; w.completedTasks++; w.unlock(); } } completedAbruptly = false; } finally { processWorkerExit(w, completedAbruptly); } }
publicclassTreadLocalNormalUsage{ publicstatic Set<String > dateSet = new HashSet<>();
publicstaticvoidmain(String[] args){ ThreadPoolExecutor poolExecutor = new ThreadPoolExecutor(100, 100, 10, TimeUnit.MILLISECONDS, new ArrayBlockingQueue<>(10)); for (int i = 0; i < 100; i++) { int finalI = i; poolExecutor.execute(new Runnable() { @Override publicvoidrun(){ dateParse(finalI); }
publicvoiddateParse(int i){ Date date = new Date(1000 * i); SimpleDateFormat dateFormat = ThreadLocalDateFormatter.dateFormatThreadLocal.get(); dateSet.add(dateFormat.format(date)); System.out.println(dateFormat.format(date)); } });
public T get(){ Thread t = Thread.currentThread(); //获取当前线程的ThreadLocalMap ThreadLocalMap map = getMap(t); //如果对应的map不为空 if (map != null) { //通过map获取对应的值 ThreadLocalMap.Entry e = map.getEntry(this); if (e != null) { @SuppressWarnings("unchecked") T result = (T)e.value; return result; } } //反之则调用初始化方法 return setInitialValue(); }
set()
1 2 3 4 5 6 7 8 9
publicvoidset(T value){ Thread t = Thread.currentThread(); ThreadLocalMap map = getMap(t); if (map != null) map.set(this, value); else createMap(t, value); }
ThreadLocalMap 类
键:ThreadLocal 对象
值:存储对应的值
ThreadLocal 哈希冲突解决办法:线性探测法(发生冲突判断下一个位置是否为空)
4. 注意点
内存泄漏问题(对象不在使用,但却无法回收)
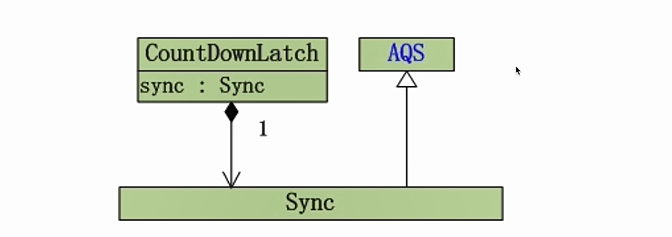
3. AQS
1. 原理解析
1. State 状态
在不同的并发类中有不同的含义
Semaphore 剩余许可证的数量
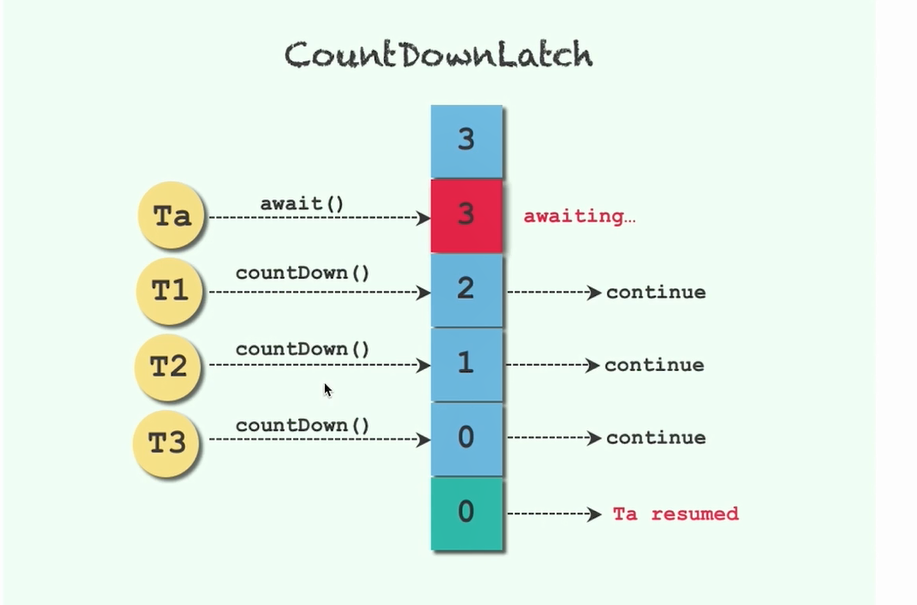
CountDownLatch 需要倒数的数量
ReentrantLock 表示可重入锁的次数 当 state 表示锁不被任何线程持有
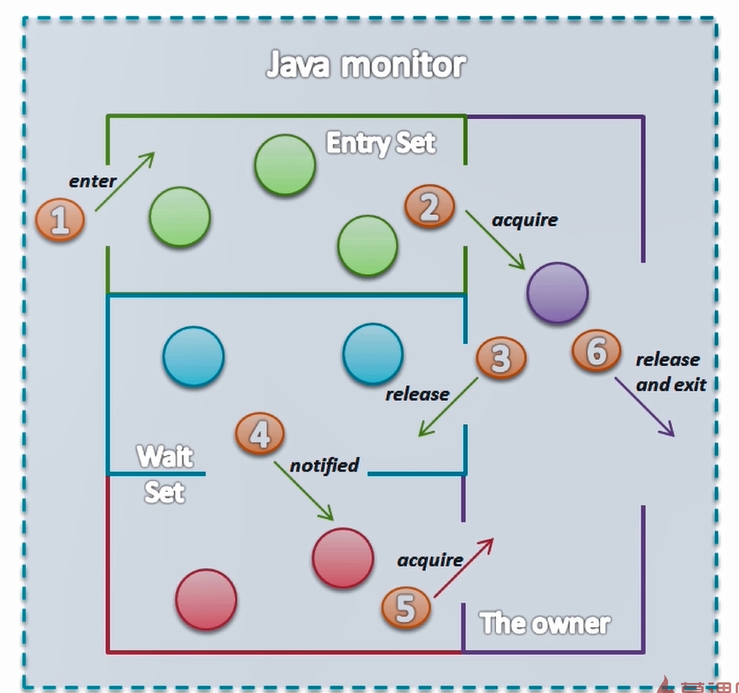
2.FIFO 队列
存放等待线程的双向队列
3. 工具类实现的获取/释放方法
获取方法(**导致线程阻塞**)
ReentrantLock 判断 state 是否为 0,如果不为为 0 则会阻塞
Semaphore 通过 acquire 方法获取到 state,判断 state 是否为正数,是则 state-1 可以获取一个许可证
privatevoiddoAcquireSharedInterruptibly(int arg) throws InterruptedException { final Node node = addWaiter(Node.SHARED); boolean failed = true; try { for (;;) { final Node p = node.predecessor(); if (p == head) { int r = tryAcquireShared(arg); //如果state大于0则将线程放入阻塞队列 if (r >= 0) { setHeadAndPropagate(node, r); p.next = null; // help GC failed = false; return; } } if (shouldParkAfterFailedAcquire(p, node) && parkAndCheckInterrupt()) thrownew InterruptedException(); } } finally { if (failed) cancelAcquire(node); } }
//公平锁的方式获取资源state protectedinttryAcquireShared(int acquires){ for (;;) { if (hasQueuedPredecessors()) return -1; int available = getState(); int remaining = available - acquires; if (remaining < 0 || compareAndSetState(available, remaining)) return remaining; } }
//非公平锁的方式获取资源state finalintnonfairTryAcquireShared(int acquires){ for (;;) { int available = getState(); int remaining = available - acquires; if (remaining < 0 || compareAndSetState(available, remaining)) return remaining; } }